
Trade Commander · Execute
The order cockpit
on your chart.
Say what you're willing to lose and where the stop goes. Trade Commander works out the size, puts the stop and targets on with the fill, and manages the whole bracket while you trade. Nothing reaches your broker until you press a button that says what it's about to send.
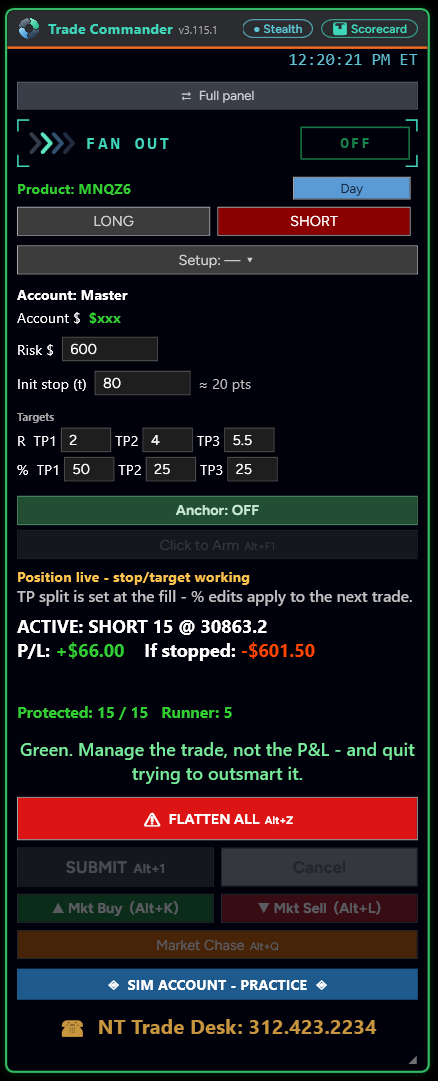
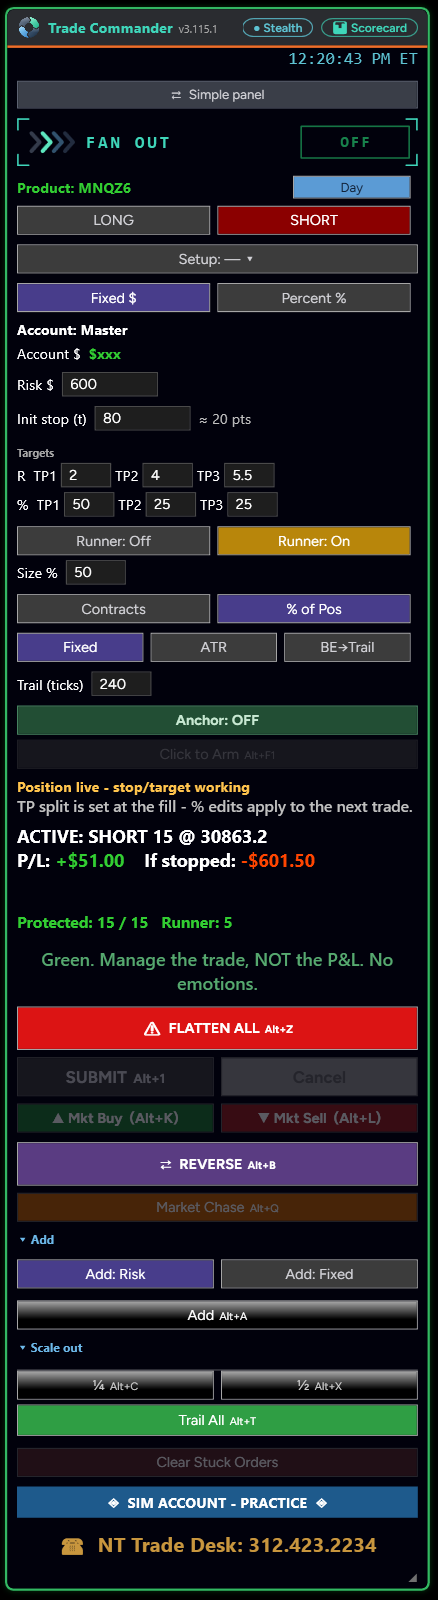
v3.114. Same engine, same trade, one click apart. Balance hidden by Stealth.
The plan
Download the plan. It draws itself.
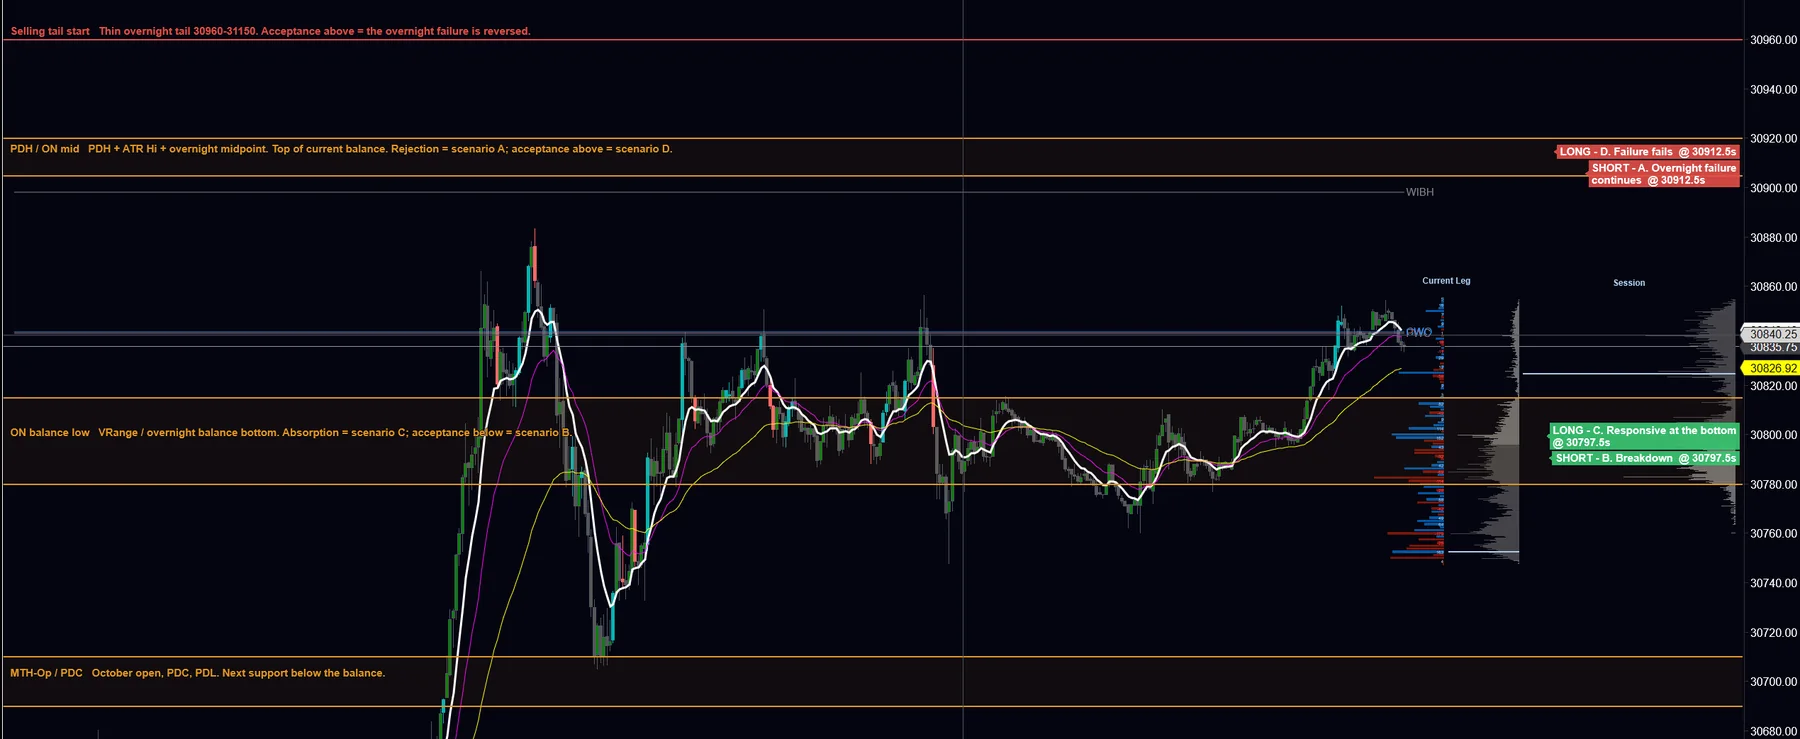
The day's plan lands on your chart as it was written: the zones and levels with their notes on the left, and each scenario's trigger on the right, long or short, at its price. The same plan draws on Sierra Chart, TradingView and Tradovate.
The plan check
It reads the plan before you send.
Draw a trade and Trade Commander says how it sits against today's plan, in the same words the Scorecard will grade it with afterward. It's advice, not a gate: nothing here places, blocks or moves an order on its own.
The tag
IDEA, EARLY, WRONG SIDE
A tag beside the entry names the plan idea you're on, or says why you're not. It clears once you're filled; the Scorecard keeps the grade.
Triggers
Acceptance isn't a touch
An acceptance idea only counts once price has accepted past its entry. Before that, the tag says EARLY and names the price it's waiting for. Rejection and absorption ideas count inside their entry range.
Plan stop
USE PLAN STOP
When your entry matches an idea, its stop draws as a dashed line just past the plan's wrong-if price. One click moves your stop there and re-sizes from your risk: a wider stop means fewer contracts, never more dollars at risk.
Objectives
The plan's targets beside yours
The idea's objectives draw next to your R targets, so you can see when your first target stops well short of where the plan expects price to go.
Your stop
A warning when it's misplaced
If your stop sits inside a plan zone, or right on the idea's wrong-if with no cushion, it says so beside the STOP flag.
Yours to switch off
Two switches
Turn the tag off, or just the plan stop line, in Trade Commander's settings.
Getting in
Pick a side. Click the chart. Submit.
Picking LONG or SHORT arms the chart. Clicking draws the whole trade: entry, stop and targets. Nothing is sent until you press Submit.
The rule
Submit is the only thing that sends a planned trade
It names the trade before you press it: SUBMIT LONG 4. If the trade on the chart isn't the side you drew, it turns amber and asks twice.
Direction
Stop below entry is a long
Stop above entry is a short. Drag your stop across the entry and the trade flips, live, with nothing sent. Every part of the panel reads that same fact, so they can't disagree.
Click, don't drag
Click places, drag pans
A trade is placed only when you click and let go without moving, so scrolling the chart can never drop a bracket. Placing disarms the chart, so a stray second click can't move your plan.
Right now
One-click market
Mkt Buy and Mkt Sell go straight in at market, with the stop and targets measured from the price you actually got. A second click can't stack another position on top.
Chasing
Market Chase
A resting entry that's running away from you becomes a market order in one key, with the same size, side and bracket.
Structure
Anchored entries
Anchor a breakout or reversal to a candle: entry beyond it, stop beyond the swing or the candle, tracked live until you submit.
Risk sizing
You pick the loss. It picks the size.
Most traders pick a contract count and hope the stop fits. Trade Commander works the other way round, in dollars or percent of the account.
contracts = risk ÷ (stop in ticks × tick value)
$450 at risk, a 30-tick stop on MNQ at $0.50 a tick is 30 contracts. Widen the stop to 60 ticks and it's 15: wider stop, fewer contracts, same dollars at risk.
It always rounds down, and Max contracts is a hard ceiling. Stops are in ticks, with the points shown beside the box so a "30" can never quietly mean 7.5 points.
After you submit, your risk number is a brake. The size is locked, so dragging the entry away from the stop would only add risk. The entry line stops at your number, and the OVER RISK band measures the trade against the figure you typed, not against itself.
The bracket
Entry, stop, three targets and a runner
Targets are set in R, multiples of your stop distance, so one ladder fits every trade whatever the stop.
Targets
A ladder in R
TP1 2R, TP2 4R, TP3 5.5R by default, with how much comes off at each. Edit them mid-trade; the change belongs to that trade and your defaults are left alone.
Runner
The piece you let go
The runner carries its own stop, so it survives your targets and can trail: fixed ticks, ATR, or breakeven then trail. Split a runner off a target mid-trade, and when the last target is gone the runner takes over.
Breakeven
One click, or automatic
The BE button moves every protective stop to entry plus your buffer at once; auto-breakeven does it when you're far enough ahead. Improve only, and it reports exactly what moved.
Live flags
Move it by dragging
Drag the stop or a target and the real order moves with it. Planned flags look planned: dimmer and muted until they're live.
Scaling
Add, scale out, add a target
Adds re-split the bracket so the whole position stays covered. Add a target mid-trade, or retire one with its ✕: two clicks, so a grab at the line can't do it by accident.
Partials
Protected from the first contract
A partial fill gets a stop immediately. The targets go on when the entry completes, and the panel says so.
Getting out
Exits always fire.
FLATTEN ALL goes through a lockout, off the chart's account, and with lost state. It sits alone, full width, with nothing beside it that a panicked hand could hit instead.
Reverse builds a fresh bracket
It flips you at the same size with your normal stop, rather than mirroring the trade you're holding. The hotkey asks twice. Reverse and Flatten never share an edge.
The account you're trading, in one color
A blue SIM banner for practice, and a red LIVE ACCOUNT, REAL MONEY banner for everything else, including prop evals and funded accounts. The trade desk's phone number sits at the bottom, for the day your internet dies mid-trade.
Your account is Chart Trader's account
No second account picker to get wrong. Switch Chart Trader mid-trade and the flags lock; the status line names the account the trade is on.
The daily plan
Your levels, on your chart
The day's plan draws on the chart automatically, and the same plan draws on Sierra Chart, TradingView and Tradovate.
Streaming
Stealth
Hide account names, or names and every dollar figure, on the panel and in the log.
Journal
Setup tags
Tag the setup before you take the trade. It rides into Caddie's journal, and the Scorecard shows which setups actually pay.
Your panel
Simple or Full, your size
Flip faces mid-trade; your position rides through it. Drag to resize, zoom the whole panel, and it stays where you put it.
Hotkeys
Every action has a key
Submit Alt+1, Flatten Alt+Z, Mkt Buy Alt+K, Mkt Sell Alt+L, Reverse Alt+B, scale out Alt+C and Alt+X, Trail All Alt+T. Nine of eleven rebind.
Coaching
A line that knows your state
A short note under the status line, sized to what you're doing. Yours to edit.
Keyboard
The keys
Every hotkey stays live on the Simple face. A panel box you're typing in owns the keyboard, so nothing fires out from under you mid-edit.
| Key | Action |
|---|---|
| Alt+1 | Submit: sends the planned bracket |
| Alt+F1 | Arm: gets the chart ready for a click. Never sends. |
| Alt+K / Alt+L | Market buy / market sell, fully bracketed |
| Alt+Q | Market Chase |
| Alt+A | Add to the position |
| Alt+C / Alt+X | Scale out ¼ / ½ |
| Alt+T | Trail All |
| Alt+B | Reverse (asks twice) |
| Alt+Z | FLATTEN ALL |
Run it on Sim first.
Place ten trades on Sim before it sees real money. The build, the manual and the help are in the Discord.